Thanks for downloading AM Image Master!
Note: SiteStripe Fixer features have been retired from AM Image Master. It has been over two years since Amazon decommissioned SiteStripe images, and we have now removed these legacy features from the plugin. This allows us to simplify the plugin, improve the overall user experience, and reduce the complexity of the codebase.
Contents
Getting Your Amazon Creators API Credentials (Free)
The Amazon Creators API is free for approved Amazon Associates accounts. You need to have been accepted into the Amazon Associates program to generate credentials and have made a minimum amount of referrals.
The Creators API uses separate credentials per region. If you only promote Amazon.com or Amazon.ca, you only need the USA & Canada credentials. If you also use international Amazon stores, you will need a second set of EU credentials.
USA & Canada Credentials
- Log in to Amazon Associates Central (USA).
- Navigate to Tools > Creators API.
- Click “Create App”
- Generate your Creators API credentials. You will receive a Credential ID and Credential Secret.
- Keep these credentials secure — you’ll enter them into the plugin settings.
EU & India Credentials (Optional)
Only needed if you want to embed images from Amazon.co.uk, Amazon.de, Amazon.fr, or Amazon.in.
- Log in to Amazon Associates Central (UK).
- Navigate to Tools > Creators API.
- Click “Create App”
- Generate your Creators API credentials.
- You’ll enter these separately in the plugin settings under the EU & India section.
To find your Associates Tag (Tracking ID):
- Go to your Amazon Associates Central for the relevant marketplace.
- Navigate to the account settings or the tracking ID section.
- Your Associate Tag (Tracking ID) will be listed here. You can use any valid tracking ID for that marketplace. You’ll need a separate tracking ID for each Amazon store you use.
Plugin Settings
Once you have your credentials, go to AM Image Master in your WordPress admin menu. The settings page is the main page of the plugin.
Entering Your API Credentials
You’ll see two credential sections on the settings page:
- USA & Canada API Credentials — Enter the Credential ID and Secret from your Amazon Associates (USA) account. Click “Test and Save Keys” to verify the connection.
- EU & India API Credentials — Enter the Credential ID and Secret from your Amazon Associates (UK) account. Click “Test and Save Europe Keys” to verify the connection. Only needed if you embed images from Amazon.co.uk, Amazon.de, Amazon.fr, or Amazon.in.
Each set of credentials has its own Test and Save button. When you click it, the plugin will verify the credentials with Amazon and save them if successful.
Associates Tags (Tracking IDs)
The Amazon.com Associates Tag (USA) field is for your default US tracking ID.
If you’ve signed up for other international Amazon stores, populate the tracking IDs for each marketplace further down the settings page under Tracking IDs for International Stores.
Image Size
Choose from Small (75px), Medium (160px), or Large (500px). These are the only sizes Amazon provides via the API. Large images may appear too big in some layouts — see the troubleshooting section below for CSS to resize them.
Adding Amazon Images to Posts (ImageEmbed)
ImageEmbed lets you insert Amazon product images with affiliate links directly into your posts. This feature is available in the Pro version.
If using the block editor, look for the “Amazon Image (From API)” block:

Enter an individual Amazon product URL (e.g. https://www.amazon.com/dp/B09ZLTMWWH/). This works for links from Amazon US, Canada, UK, Germany, France and India. For Amazon.com (USA), you can alternatively enter just the Amazon product code (ASIN): e.g. B09ZLTMWWH.
Optionally enter Alt text that will appear on the image.
If you check “Include link text“, a text link will be added below the image. Make sure to provide the link text.
Choose Image Size. You can manually resize the image afterward using the standard image resize features in the WordPress block editor.
If you leave the tracking ID blank, it will default to the one you added in the plugin settings for that marketplace. The tracking ID must be a valid one for your Amazon Associates account.
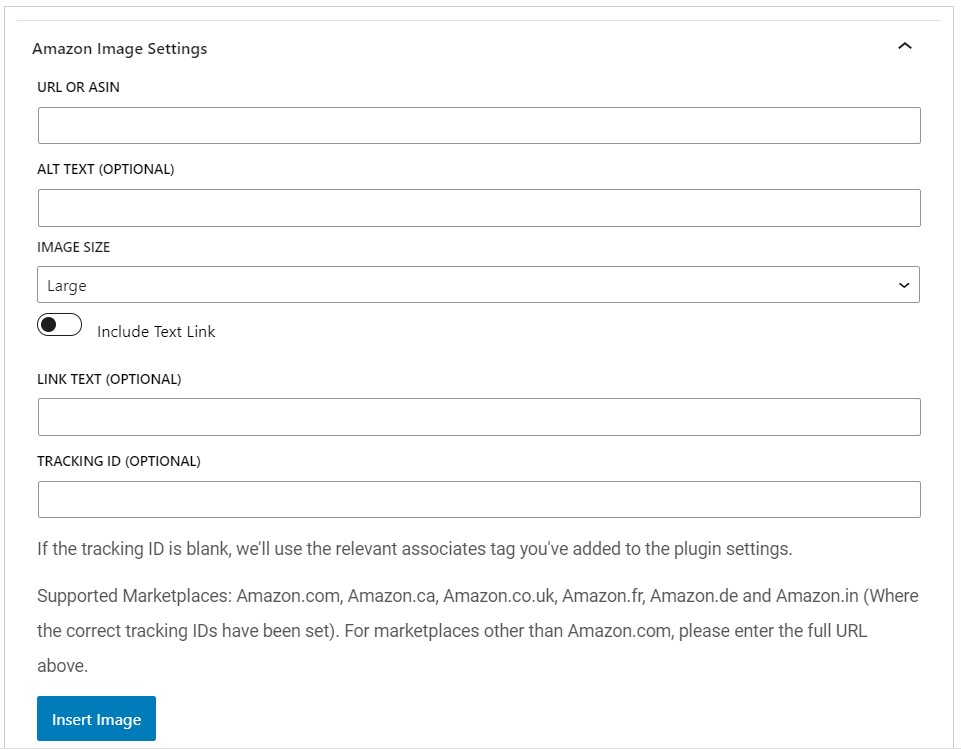
Click “Insert Image”:
If you’re using the Classic editor, make sure you’ve enabled Visual mode and look for the “Amazon Image (From API)” button.

Supported Amazon Marketplaces
The plugin works with the following Amazon marketplaces:
- USA & Canada (using NA credentials): Amazon.com, Amazon.ca
- EU & India (using EU credentials): Amazon.co.uk, Amazon.de, Amazon.fr, Amazon.in
Make sure you have the correct tracking ID entered in Settings for each marketplace you use.
Troubleshooting
Seeing Request Throttling Issues?
Common issue: If you’re seeing “Request throttling” errors, this can be a temporary issue on Amazon’s side for new API credentials. Wait a few minutes (or hours if necessary) and try again.
UK / EU / India Images Not Working?
If you get a credentials error when inserting images from Amazon.co.uk, Amazon.de, Amazon.fr, or Amazon.in, make sure you have entered your EU & India API Credentials in the plugin settings. These are separate from your USA credentials and must be generated from Amazon Associates (UK).
Large Image Sizes are too large on your site?
If you picked “Large” image size and they’re showing up too large on your site, you can add this CSS to resize all large Amazon images. Copy and paste the CSS below into the “Image CSS (Optional)” textbox in the plugin settings:
img[src*="_SL500_.jpg"][src*="m.media-amazon"] { height: auto; max-width: 50%; display: block; margin: 0 auto; } @media (max-width: 600px) { img[src*="_SL500_.jpg"][src*="m.media-amazon"] { max-width: 80%; margin: 0 auto; } }You can adjust the max-width to your liking. The CSS above makes the images bigger on mobile.
To target only right-aligned images specifically, add this in addition to the code above (place it before the @media query):
.alignright img[src*="_SL500_.jpg"][src*="m.media-amazon"], img[src*="_SL500_.jpg"][src*="m.media-amazon"].alignright { max-width: 30%; }Refreshing Caches
Note: If changes aren’t immediately visible on your site, you may need to clear your website caches.
WordPress websites often use several types of caches. Here are the common ones to check:
- WordPress Plugin Cache (e.g., W3 Total Cache, WP Super Cache): Go to your caching plugin’s settings and look for an option to empty or clear the cache.
- Object Cache (e.g., Redis): If you use a Redis plugin, navigate to its settings and flush the cache. For server-level access, use
redis-cli FLUSHALL. - Hosting Provider Cache: Many hosting providers have their own caching. Check your hosting dashboard for a “Clear Cache” option.
- CDN Cache (e.g., Cloudflare): Log into your CDN dashboard and purge the cache.
- Ad Network Cache (e.g., Ezoic): Check your ad network’s dashboard for cache control options.
Clear caches starting from the top of this list first.
Thanks for using AM Image Master!